Serverless Rust on GCP Cloud Run: From Basic Deployment to Optimized Container Builds
Disclaimer: This content reflects my personal opinions, not those of any organizations I am or have been affiliated with. Code samples are provided for illustration purposes only, use with caution and test thoroughly before deployment.
A few weeks ago, I published a comparison of Rust across AWS Lambda, Azure Functions, and GCP’s serverless offerings. I was pretty harsh on GCP, essentially dismissing Cloud Run as “not really serverless” and suggesting Google was missing the boat entirely.
The GCP community didn’t let that slide.
Multiple comments and messages pointed out that I hadn’t given Cloud Run a fair evaluation. They were right. I was so focused on function-as-a-service models that I didn’t appreciate what GCP was actually offering with their “serverless containers” approach.
I had wrongly assumed that “containers” meant always-on hosts, but Cloud Run actually uses a microVM security model that provides strong isolation while still billing you only for the time your function runs - just like other serverless platforms.
So I did what any curious engineer should do: I went back and gave it another try.
And honestly? I was pleasantly surprised. Cloud Run’s container-first approach actually works brilliantly with Rust, and the developer experience is surprisingly smooth once you understand the optimization patterns.
Getting Rust applications running on Google Cloud Run can be incredibly rewarding, but the journey from “Hello World” to production-ready containers involves some important optimization steps. In this post, I’ll walk you through deploying a Rust web service to GCP Cloud Run and then show you how to dramatically reduce your container size using multi-stage builds and cargo-chef.
I’m not going to repeat why Rust is ideal for serverless. If you missed the “why”, please read the introduction of this post.
The Starting Point: A Simple Rust Web Server
Let me start with a practical example based on the excellent rustless_webserver_demo project (thanks to Marcos Manuel Ortega on LinkedIn for introducing me to this). This demonstrates a minimal Rust web service using Hyper that responds with “Hello, Rustless!” to any request.
Here’s the core application code:
# use statements...

async fn rustless(_: Request<impl hyper::body::Body>) -> Result<Response<Full<Bytes>>, Infallible> {
    Ok(Response::new(Full::new(Bytes::from("Hello, Rustless!"))))
}

#[tokio::main]
async fn main() {
    let addr = SocketAddr::from(([0, 0, 0, 0], 8080));
    let listener = TcpListener::bind(addr).await.unwrap();

    loop {
        let (stream, _) = listener.accept().await.unwrap();
        let io = TokioIo::new(stream);

        tokio::task::spawn(async move {
            http1::Builder::new()
                .serve_connection(io, service_fn(rustless))
                .await
                # error handling...
        });
    }
}
The Cargo.toml includes the necessary dependencies:
[package]
name = "rustless"
version = "0.1.0"
edition = "2021"

[dependencies]
hyper = { version = "1.6", features = ["full"] }
tokio = { version = "1", features = ["full"] }
http-body-util = "0.1"
hyper-util = { version = "0.1", features = ["full"] }
The Naive Approach: Basic Dockerfile
The original project started with this basic Dockerfile:
FROM rust

COPY . .

EXPOSE 8080

RUN cargo build --release

CMD [ "./target/release/rustless" ]
Let’s break down what each line does:
FROM rust- Start with the official Rust Docker image as our base (includes Rust compiler and tools)COPY . .- Copy all files from our local directory into the containerEXPOSE 8080- Tell Docker that this container will listen on port 8080 (note: correct syntax is justEXPOSE 8080, notEXPOSE 8080:8080)RUN cargo build --release- Compile our Rust application in release mode (optimized)CMD [ "./target/release/rustless" ]- When the container starts, run our compiled binary
This works, but as we’ll see later, it’s not optimal for production use.
Setting Up GCP Cloud Run
Before we optimize, let’s get the basic deployment working. You’ll need:
- Install gcloud CLI. On Ubuntu, I recommend using snap for easier updates:
sudo snap install google-cloud-cli --classic - Authenticate and set up your project:
gcloud auth login gcloud config set project YOUR_PROJECT_ID - Enable required APIs:
gcloud services enable cloudbuild.googleapis.com
gcloud services enable run.googleapis.com
Wait a few minutes after enabling services before proceeding to avoid permission errors.
Basic Deployment with Cloud Build
The project includes a cloudbuild.yaml that handles both building and deployment:
steps:
  # Build the application image
  - name: "gcr.io/cloud-builders/docker"
    entrypoint: "bash"
    args:
      - "-c"
      - |
        docker build \
        -t gcr.io/$PROJECT_ID/${_SERVICE_NAME}:latest . && \
        docker push gcr.io/$PROJECT_ID/${_SERVICE_NAME}:latest

  # Deploy to cloud run US
  - name: "gcr.io/cloud-builders/gcloud"
    entrypoint: "bash"
    args:
      - "-c"
      - |
        gcloud run deploy ${_SERVICE_NAME} \
        --image gcr.io/$PROJECT_ID/${_SERVICE_NAME}:latest \
        --region us-central1 --platform managed \
        --allow-unauthenticated

timeout: 800s

substitutions:
  _SERVICE_NAME: rustless
This Cloud Build configuration automates our entire deployment pipeline:
- Step 1: Builds a Docker image from our Dockerfile and pushes it to Google Container Registry (gcr.io)
- Step 2: Deploys that image to Cloud Run in the
us-central1region, making it publicly accessible (--allow-unauthenticated)
Now deploy with a single command:
gcloud builds submit .
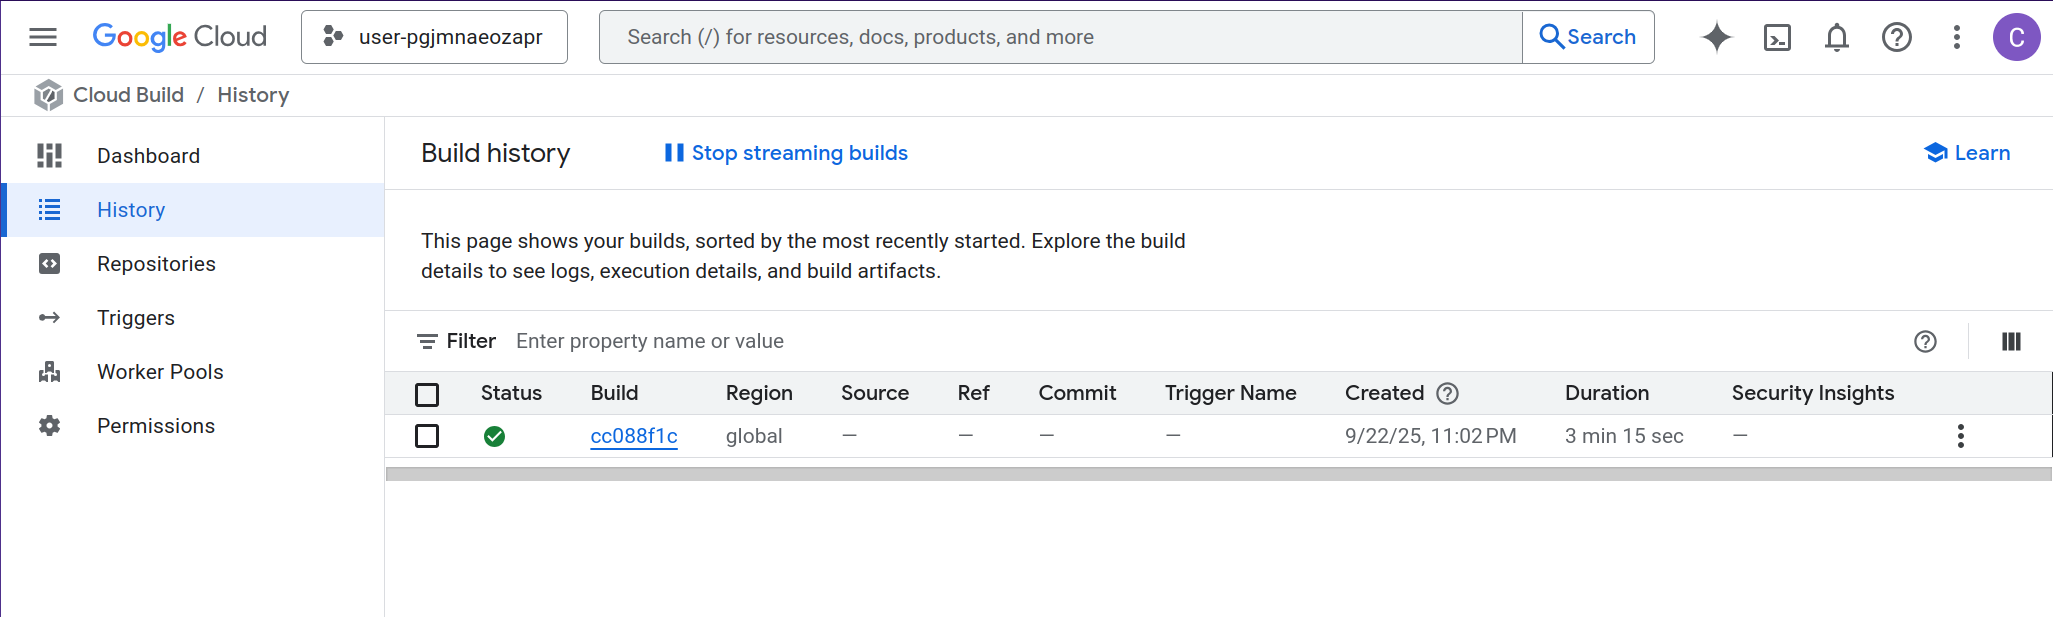
You can then go to the Google Cloud Console > Cloud Build > History to see the running build:
At the end of the build output, you’ll see a URL like:
https://rustless-3qqsqbdsuq-uc.a.run.app
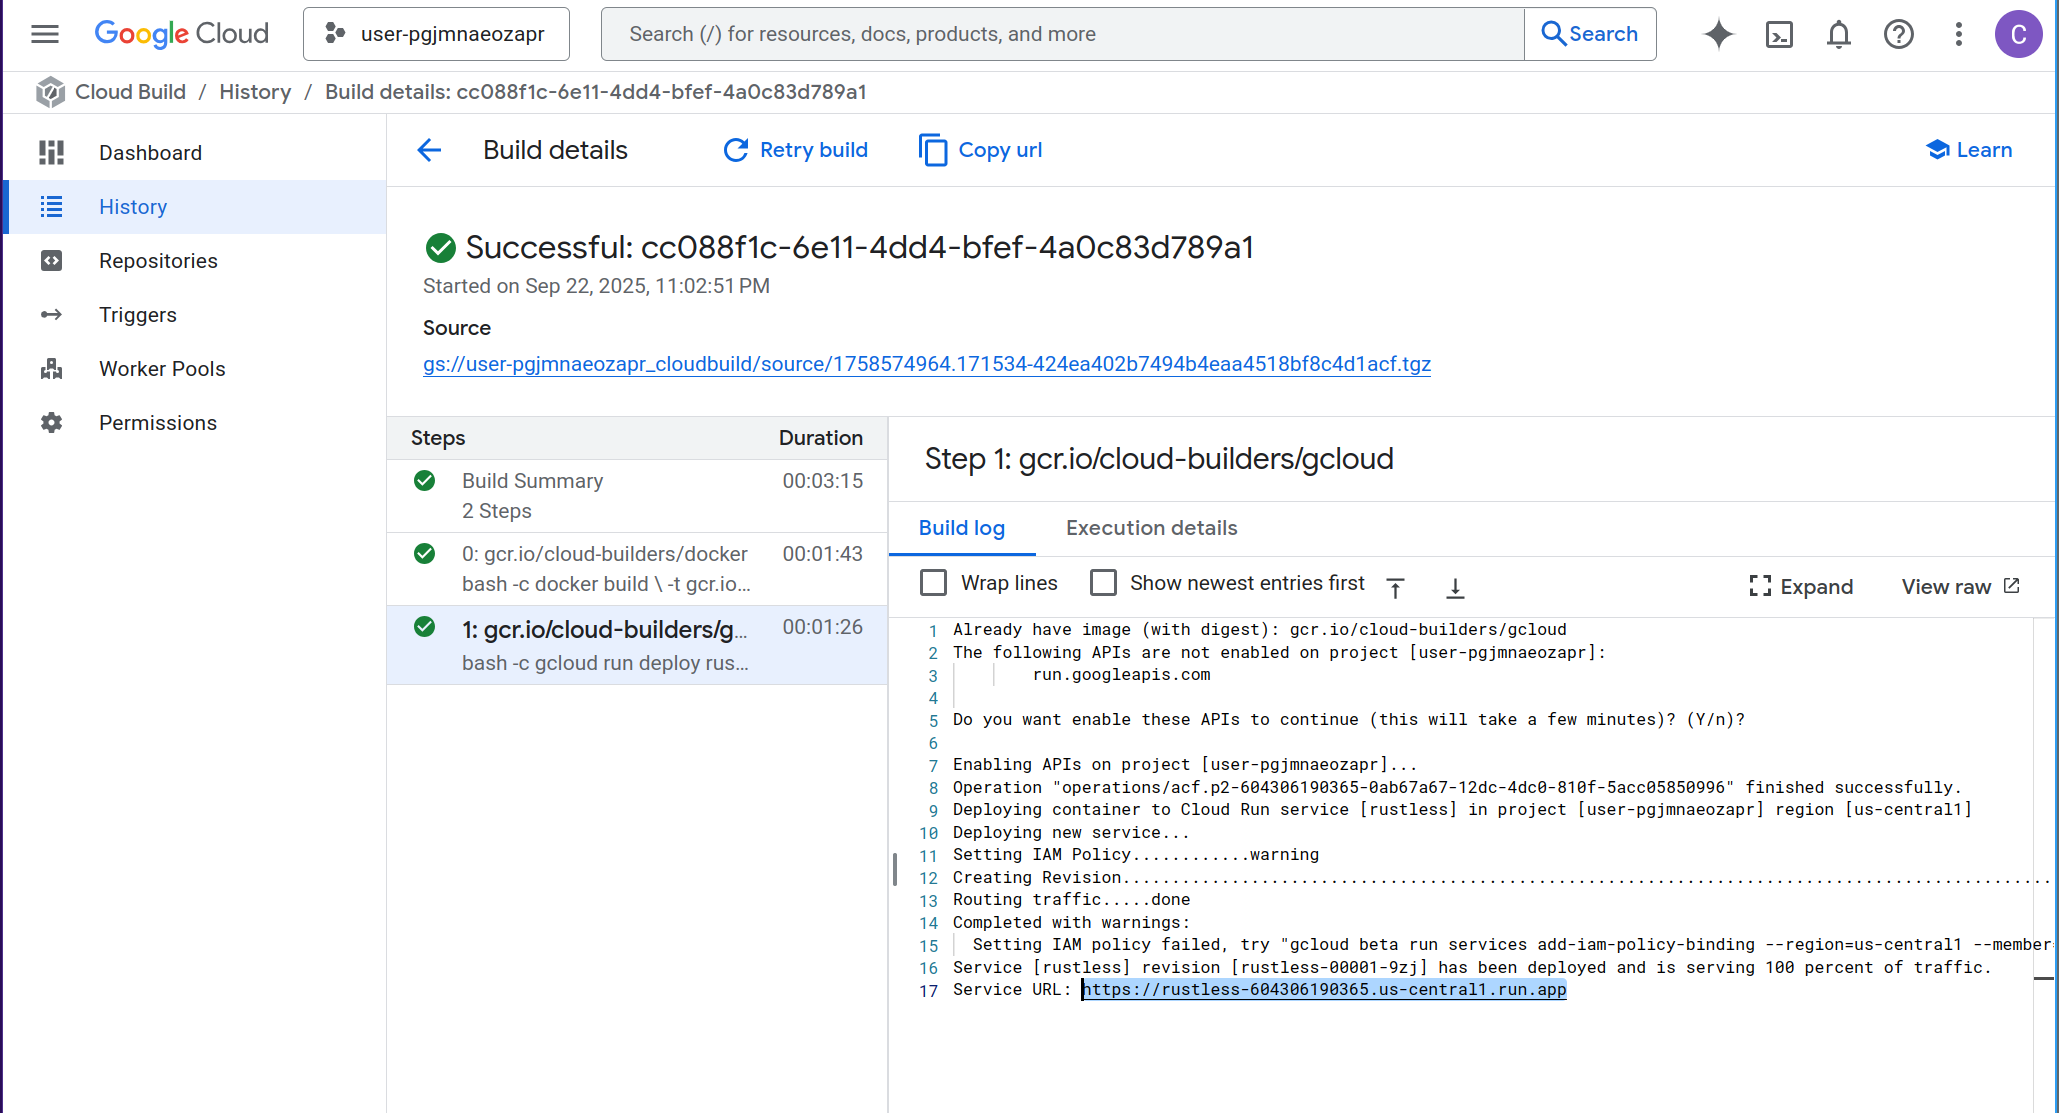
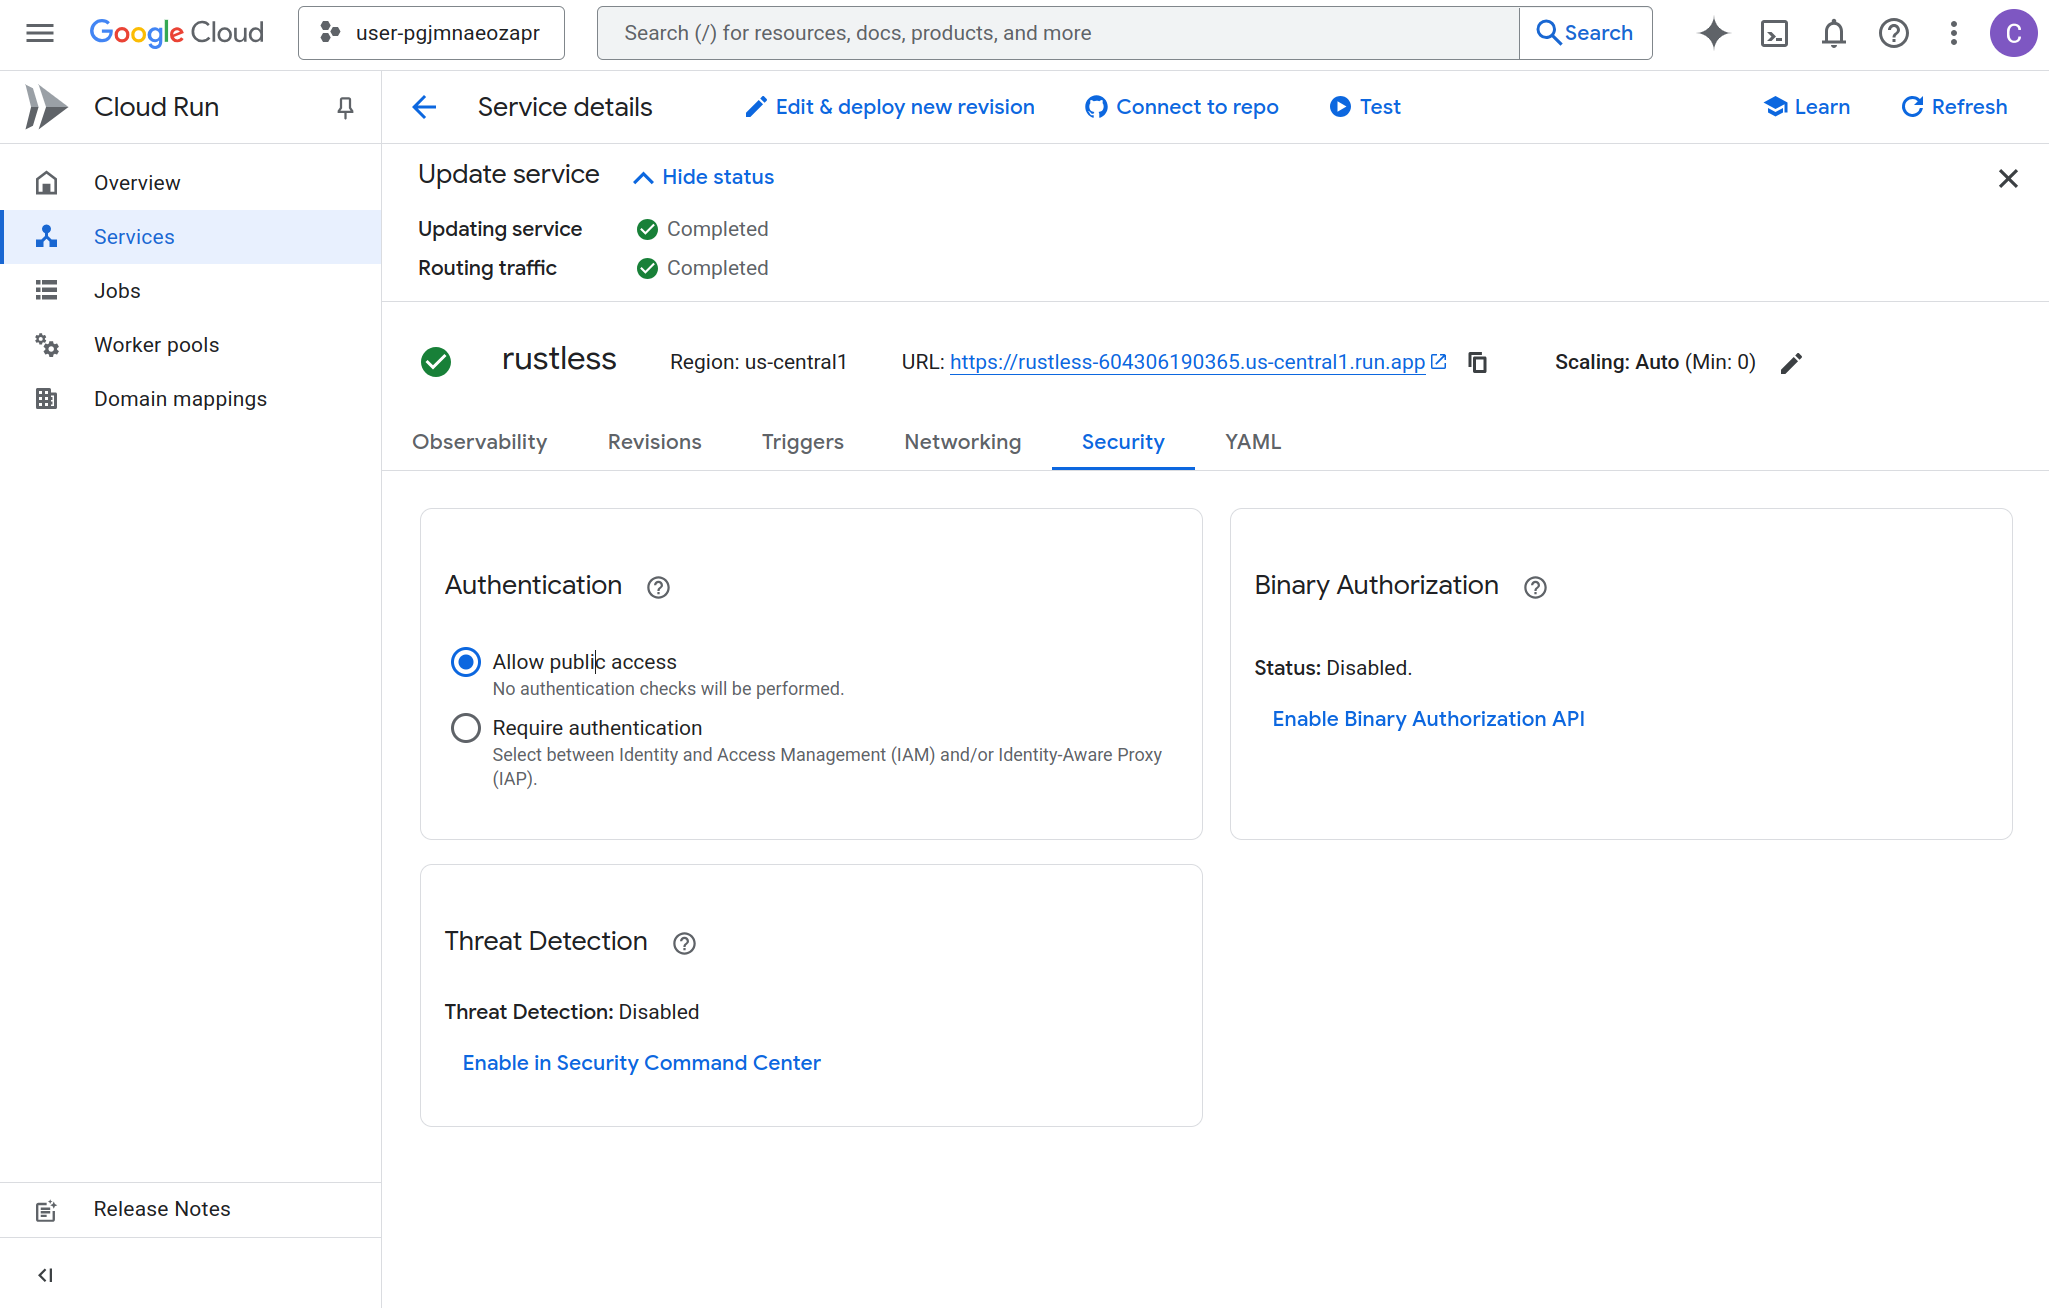
Once deployment is complete, navigate to the Google Cloud Console > Cloud Run to see your deployed service:
You can test your deployed service in two ways:
-
Make it publicly accessible (Cloud Run > Security tab > Allow unauthenticated invocations): Only do this if you want to expose your website or API to unauthenticated users on the internet. This removes all authentication requirements.
-
Test with Cloud Shell (recommended for development): Cloud Shell is Google’s browser-based terminal that runs in the GCP network with your authenticated identity. Since it’s within the GCP ecosystem, it can access your Cloud Run service using IAM authentication without requiring the service to be public. You can use the “Test” button in the Cloud Run console, or run
curlcommands directly from Cloud Shell. Later, when you’re ready for production, you can implement proper authentication at the API or website level while keeping the Cloud Run service itself protected by IAM.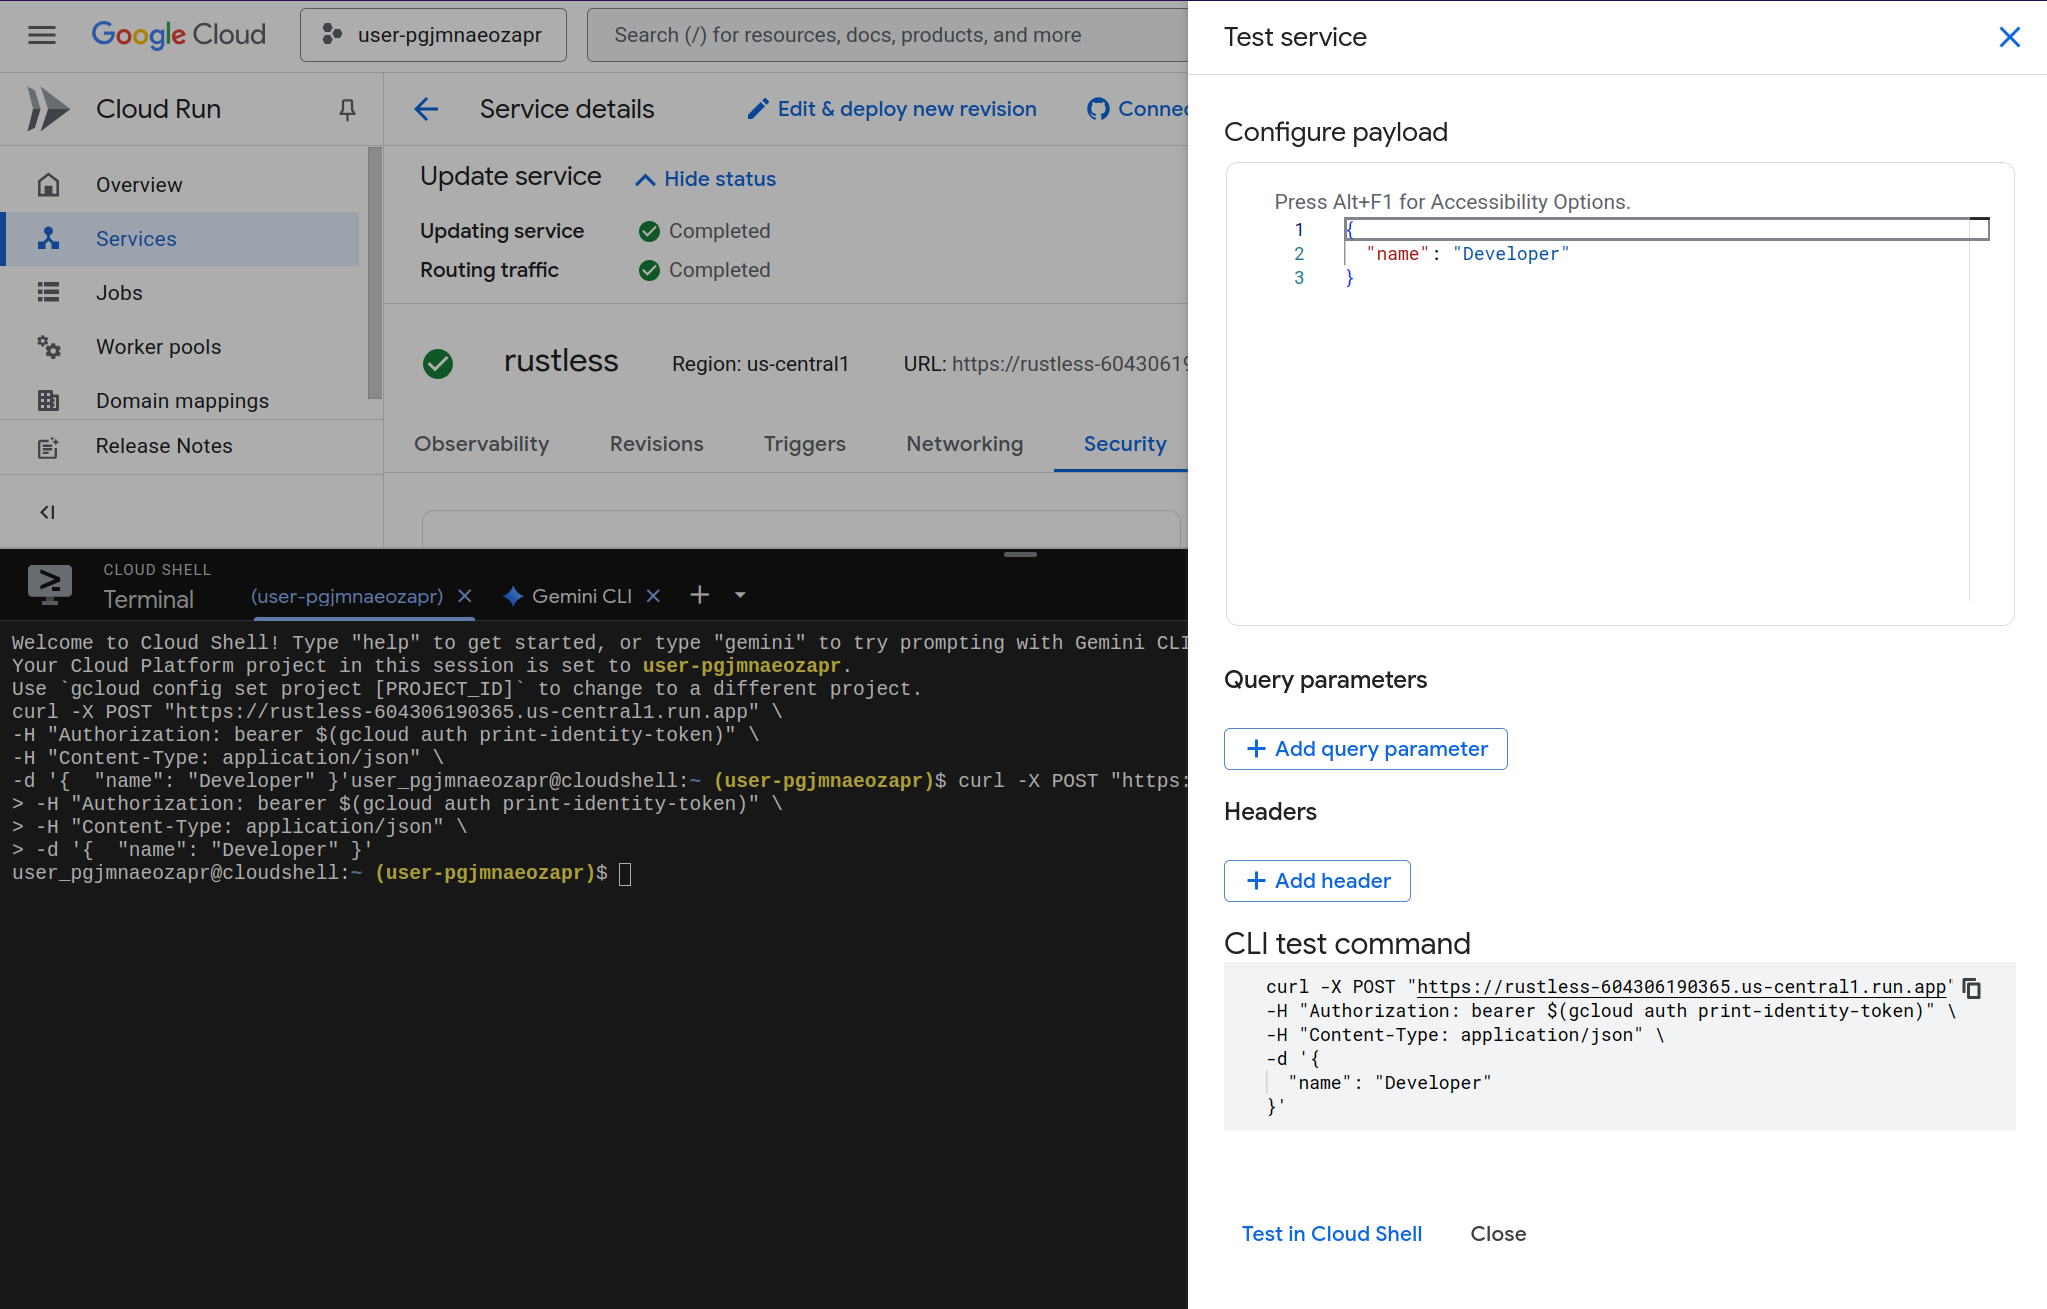
Why the Basic Approach Needs Improvement
While the basic Dockerfile works, it has several problems that become apparent in production:
- Massive container size - The
rustbase image includes the entire Rust toolchain, compilers, and build tools - Security concerns - Development tools in production containers increase attack surface
- Inefficient caching - Every code change invalidates the entire dependency build cache
Optimizing Container Size with Multi-Stage Builds and Cargo-Chef
Now comes the interesting part - optimization. The improved Dockerfile uses several techniques:
FROM docker.io/lukemathwalker/cargo-chef:latest-rust-1 AS chef
WORKDIR /app

FROM chef AS planner
COPY . .
RUN cargo chef prepare --recipe-path recipe.json

FROM chef AS builder
COPY --from=planner /app/recipe.json recipe.json
# Build dependencies - this is the caching Docker layer!
RUN cargo chef cook --release --recipe-path recipe.json
# Build application
COPY . .
RUN cargo build --release

# We do not need the Rust toolchain to run the binary!
FROM docker.io/library/debian:bookworm-slim AS runtime
WORKDIR /app
COPY --from=builder /app/target/release/rustless /usr/local/bin
EXPOSE 8080
ENTRYPOINT ["/usr/local/bin/rustless"]
What’s Happening Here?
Stage 1: Chef Setup
- Uses cargo-chef, a tool that analyzes your
Cargo.tomlandCargo.lockto create a “recipe” for building dependencies
Stage 2: Planning
- Creates
recipe.jsoncontaining dependency information - This file changes only when dependencies change, not when source code changes
Stage 3: Building
- First builds dependencies using the recipe (cached unless dependencies change)
- Then builds the actual application code
- This separation means dependency builds are cached between code changes
Stage 4: Runtime
- Uses minimal
debian:bookworm-slimbase image - Only copies the compiled binary, not the entire Rust toolchain
- Results in dramatically smaller containers
The Results
This optimization provides several benefits:
- Faster builds - Dependencies are cached and only rebuilt when
Cargo.tomlchanges - Smaller containers - Runtime image contains only the binary and minimal OS
- Better security - No development tools in production
- Fully qualified image names - Important for container registries like Podman
Alternative Base Images
The Reddit community suggests several minimal runtime options:
gcr.io/distroless/cc-debian12:nonroot- Google’s distroless with non-root userdebian:bookworm-slim- Minimal Debian installationcgr.dev/chainguard/glibc-dynamic- Chainguard’s minimal glibc image
For statically linked binaries, you could even use scratch, but that requires additional build configuration to build with musl. See this post on how to do that.
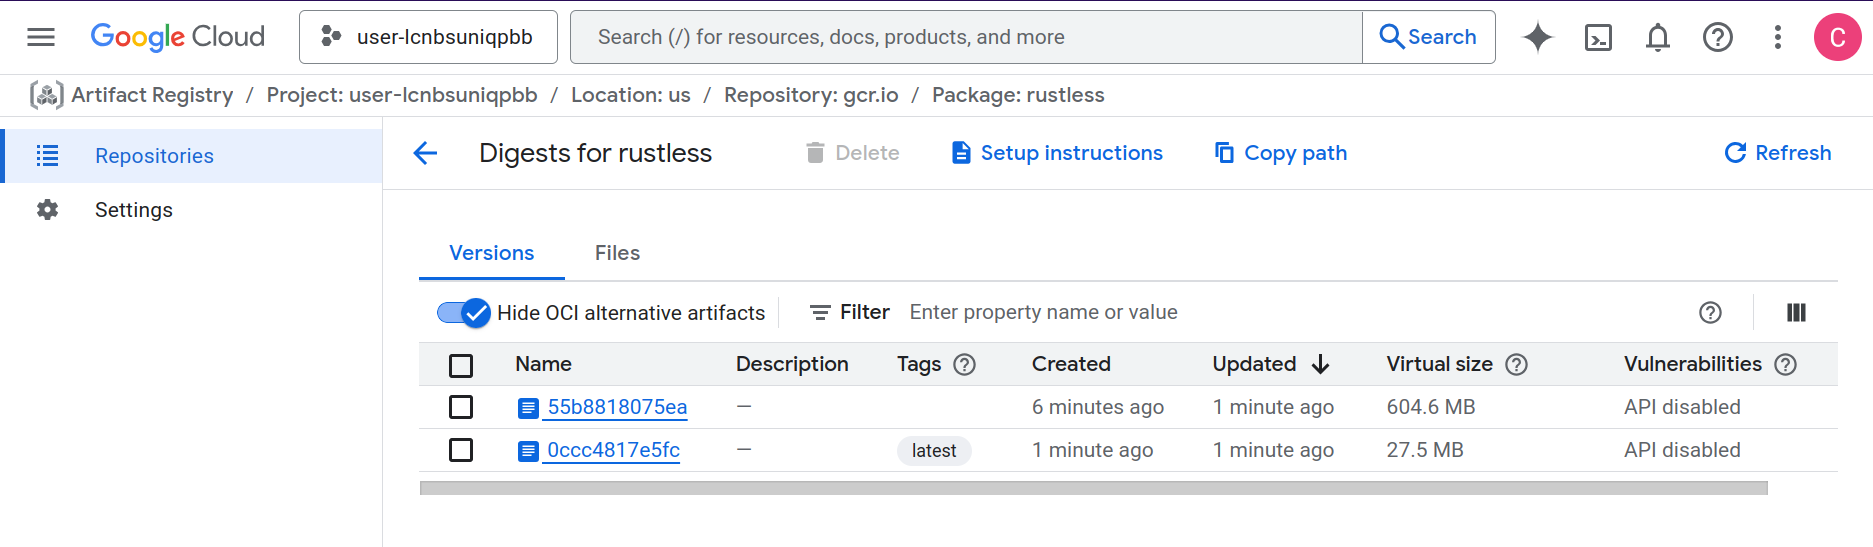
Image Size Comparison
The optimization results are impressive:
- Original approach: ~600 MB container with full Rust toolchain
- Optimized approach: ~27.5 MB container with just the binary
- Build time: The build time difference is not that different because the Rust code is very minimal so the build time is very short compared to the Docker cache miss time overhead. With bigger projects you’ll see more significant improvements in image building time.
Conclusion
Looking back at my initial comparison of Rust serverless offerings, I was wrong to assume that by using containers, GCP will not provide a good developer experience.
The developer experience is quite smooth, and it gives flexibility because you can wrap almost anything in a container.
But the container optimization process requires quite some Docker knowledge. If your development team does not have Docker expertise or just wants to focus on business logic, you need to think hard if this is what you want your developers to spend time on. Maybe you can have a platform team that builds these Dockerfiles and CI/CD for you, but then you have more communication overhead.
It’s worth noting that this post focuses on a simple “Hello World” deployment using standard HTTP libraries rather than the official GCP Rust SDK. In upcoming posts, I’ll explore the maturity and capabilities of Google Cloud’s Rust SDK to see how it compares to the AWS and Azure SDK experiences I’ve documented previously.
📚 Rust Serverless Series
This post is part of a comprehensive series exploring Rust in serverless environments across different cloud providers.